ROS Python Introduction
ROS Python Instructions for use
1.Sample program download
Click to download the sample program
https://github.com/WITMOTION/WitStandardProtocol_JY901
2.Environment installation
Robot Operating System (ROS) is a widely used software framework for robot systems, which includes a series of software libraries and tools for building robot applications. From drivers to state-of-the-art algorithms, and powerful developer tools, ROS includes everything you need to develop a robotics project. And they are all open source.
Although ROS is called the robot operating system, it is different from the operating systems in our general concept, such as Windows, Linux, iOS and Android. These operating systems such as Windows, Linux, iOS and Android manage the physical hardware resources of the computer for us, such as CPU, memory, disk, network and peripherals, provide abstractions such as processes, threads and files, and provide functions such as reading and writing files. , Create a process, create a thread, and start a thread. The level at which ROS works is not so low. It runs based on the operating system in the general concept. It is officially recommended to run on Ubuntu Linux, and provides a higher level of abstraction based on the abstraction and operation provided by the Ubuntu Linux operating system. , such as nodes, services, messages, topics, etc., and higher-level operations, such as topic publishing, topic subscription, service query and connection, etc. At the same time, ROS also provides the tools and function libraries needed to develop robot projects.
A ROS distribution is a version-identified collection of ROS packages, these are similar to Linux distributions such as Ubuntu. The purpose of the ROS distribution is to allow developers to work from a relatively stable codebase until they can move forward smoothly. Once the distribution is released, the official will limit its changes, and only provide bug fixes and non-breaking enhancements to the core package.
Currently (2018-01-28) the ROS system has released multiple versions. Some of the latest versions of ROS are as follows:
ROS basically maintains a release rhythm of a new version every year and a long-term release every two years. For more information about the release of ROS versions, such as the introduction of more releases, release plans, etc., you can refer to the Distributions home page of the ROS official site.
At present, the official recommendation is to use the latest long-term support version, namely ROS Kinetic Kame. This version should undoubtedly be adopted while seeking newness and stability. If you want to try the latest features, you can use the latest release version ROS Lunar Loggerhead.
The installation steps of ROS are as follows:
ROS kineticofficial website:http://wiki.ros.org/kinetic/Installation/Ubuntu
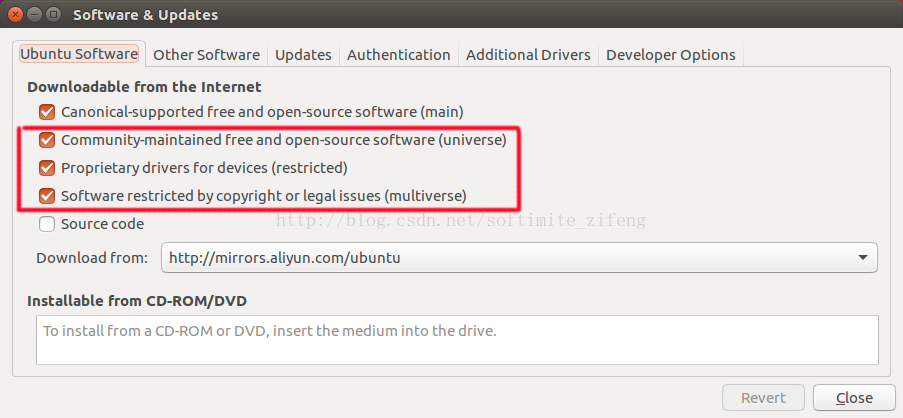
2.1 Configure repository
"restricted", "universe", and "multiverse". Generally, no configuration is required, refer to the red box in the figure below. If there is no configuration, you can refer to the Ubuntu official website。
2.2 Install
1.Set up the installation source
2.set key
3.Install
Individual package installation: It is possible to install a specific ROS package (replace "PACKAGE" in the commands below with the actual package name).
sudo apt-get install ros-kinetic-PACKAGE
eg: sudo apt-get install ros-kinetic-slam-gmapping
To find available packages, use: apt-cache search ros-kinetic
2.3 Initialization
If "time out" or error occurs, try again several times
2.4 Configure environment variables
If multiple ROS distributions are installed, ~/.bashrc must only source setup.bash for the version currently in use.
If you only want to modify the environment of the current shell, enter the following command to replace the above command: source /opt/ros/kinetic/setup.bash
2.5 install rosinstall
Dependencies needed to build the package
At this point, everything should be installed to run the core ROS packages. To create and manage your own ROS workspace, there are also a number of tools distributed separately. For example, rosinstall is a common command-line tool that allows you to easily download many source trees for ROS packages with one command. To install this tool and other dependencies for building ROS packages, run:
After completing the complete ROS installation, you can do a simple test of the installation. Can be tested with roscore and turtlesim.
2.6 Test
3.IMU package usage
3.1 Install ROS IMU dependencies
Please run the corresponding command in the terminal
If you are using ubuntu 16.04, ROS kinetic, python2:
If you are using ubuntu 18.04, ROS Melodic, python2 :
If you are using ubuntu 20.04, ROS Noetic, python3:
3.2 Create workspace
Download the sample program, put the file in the home root directory, and right-click to extract it here. Open the command terminal and run the following command:
3.3 ROS driver and visualization
Take ubuntu16.04, JY901S, python2.7 as an example
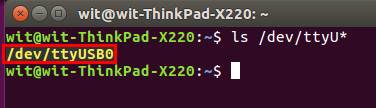
Check the USB port number. Don’t plug in the USB of the IMU first, enter ls /dev/ttyUSB* in the terminal to check it, then plug the USB into the computer, and then enter ls /dev/ttyUSB* in the terminal to check it, the extra ttyUSB device is the serial port of the IMU.
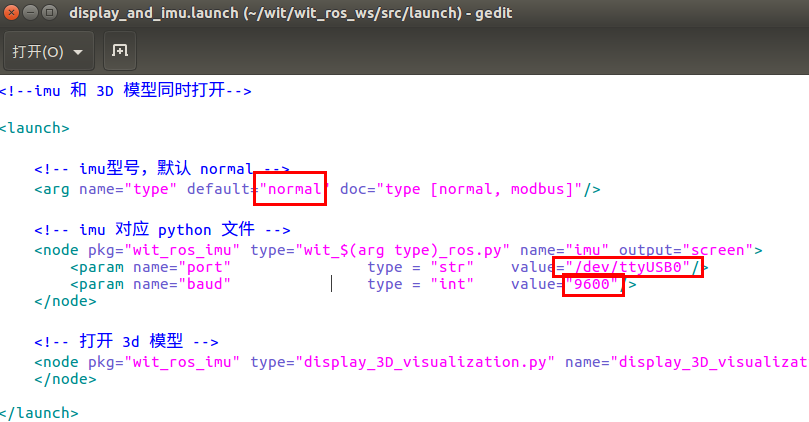
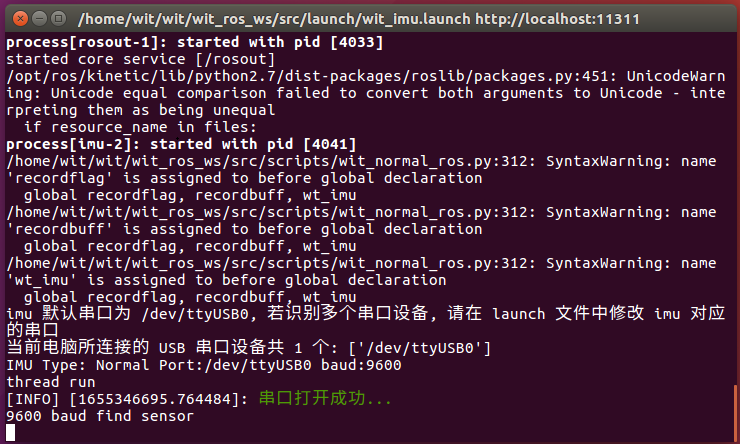
Modify parameter configuration. The parameters that need to be modified include device type, USB port number and baud rate. Enter the script directory ~/wit/wit_ros_imu/src/launch, and modify the configuration parameters in the corresponding launch file. If the device type is the modbus protocol, fill in modbus, and if the wit standard protocol is used, fill in normal. The device number /dev/ttyUSB0 (the default /dev/ttyUSB0 used by the script) is the number recognized by your computer. The baud rate is set according to the actual use. The default baud rate of JY6x series modules is 115200, and that of other modules is 9600. If the user modifies the baud rate through the host computer, it needs to be modified to the modified baud rate.
3. Give the corresponding serial port administrator rights, enter in the terminal: sudo chmod 777 /dev/ttyUSB0, prompt you to enter the administrator password, enter the password and press Enter. Note that every time you re-insert the USB port, you need to re-assign administrator privileges to the serial port.
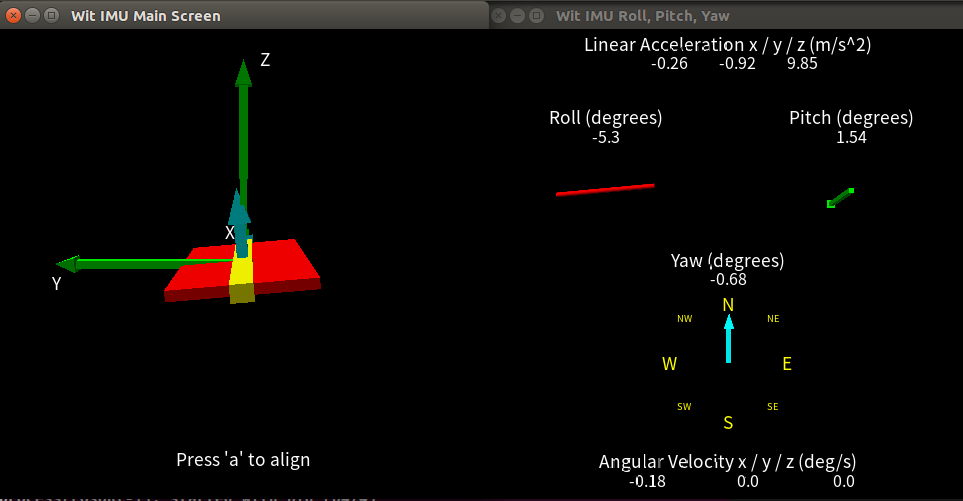
4. Open the terminal, run the imu driver, imu_type:=** is the corresponding model, you can choose [normal, modbus]
Open two new terminals and enter the following two lines of commands respectively
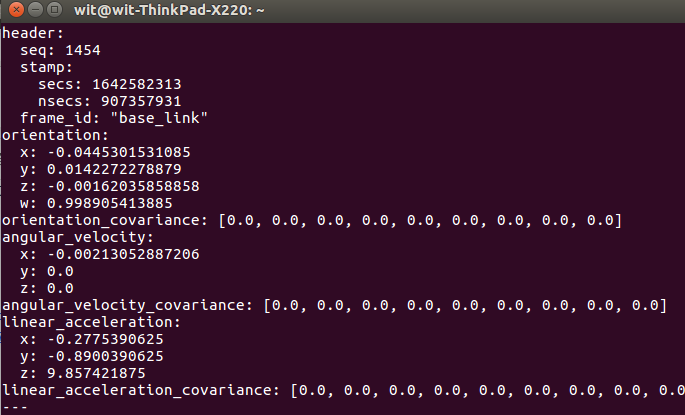
As shown in the figure below, after the driver runs successfully and the information output by rostop echo
4. Similarly, if you need to run other launch files, you need to make sure that the /dev/ttyUSB device in the launch file is correct.
5. Description of related documents
odisplay_and_imu.launch, open the IMU driver node and the visualization model written in visual. (Only supports ubuntu 16.04)
owit_imu.launch, open the IMU driver node.
orviz_and_imu.launch, opens the IMU driver node and Rviz visualization.
Operation Specific Tutorial Example:
Open the ROS system and run the relevant commands
Hold down ctrl+Alt+T to open the terminal (view all serial port files under the current device)
Use 3-in-1 or 6-in-1 to connect Witte smart sensor and insert it into the USB port under the computer with ROS system
The extra serial port is the serial port file we need
Modify the permissions of serial port files and execute terminal commands
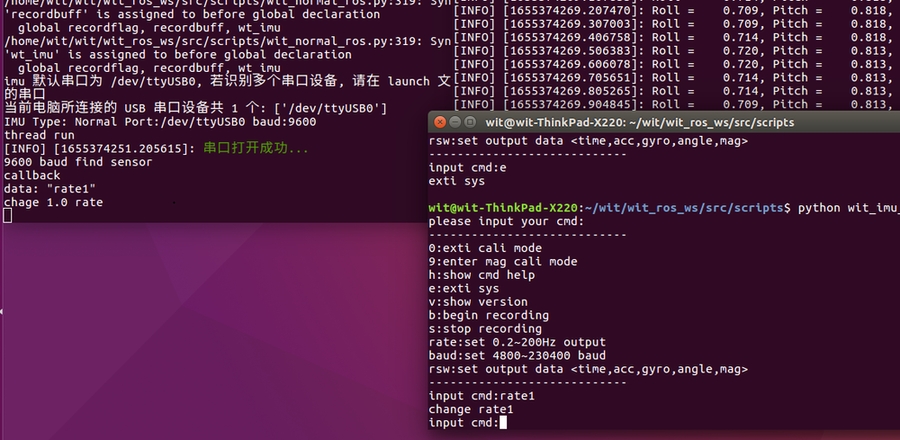
When the serial port is successfully opened, there will be a prompt message, and at the same time, the baud rate of the current sensor will be automatically retrieved, and the baud rate information will be prompted. As shown in the figure above, the baud rate of the current sensor has been successfully retrieved as 9600.
Open a new terminal
At this time, the terminal prints the relevant parameter data returned by the sensor in real time
Open a new terminal
Calibration function
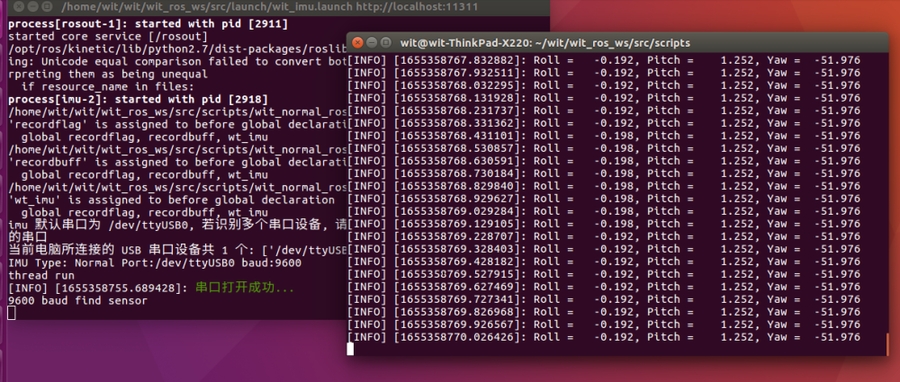
Enter the number 9 under input cmd to enter the calibration state
After placing the sensor horizontally and slowly rotating it for two circles, input the number 0 at the terminal to end the calibration
After we calibrate, the prompt message is very good or good, indicating that the calibration result is good;
When the prompt of bad appears, it means that the calibration result is not good, and it is recommended to re-calibrate.
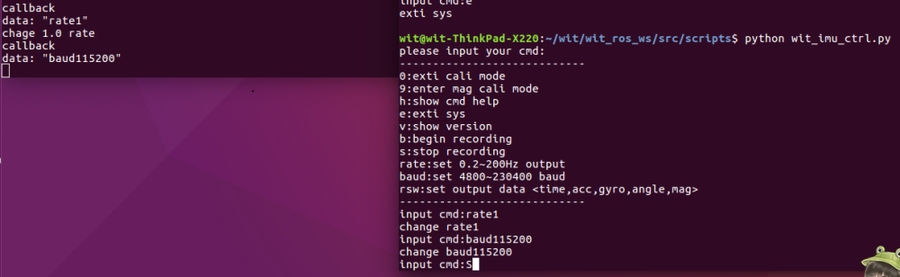
Set return rate
Enter under input cmd:
You can set the return rate to 1Hz
At this time, the second terminal will return the data detected by the sensor every 1s
Similarly, set it to 200Hz, which is rate200
Commands that can be set: rate0.2, rate0.5, rate1, rate2, rate5, rate10, rate20, rate50, rate100, rate2000
Set baud rate
Enter under input cmd:
You can set the baud rate to 115200
Similarly, the baud rate is set to 9600, which is baud9600.
Configurable commands:baud4800、baud9600、baud19200、baud38400、baud57600、baud115200、baud230400
Tip: How to verify the baud rate modification is successful
After successfully modifying the baud rate, the data of the second terminal is refreshed in real time
Can be verified with the help of serial port debugging assistant
Record and parse data
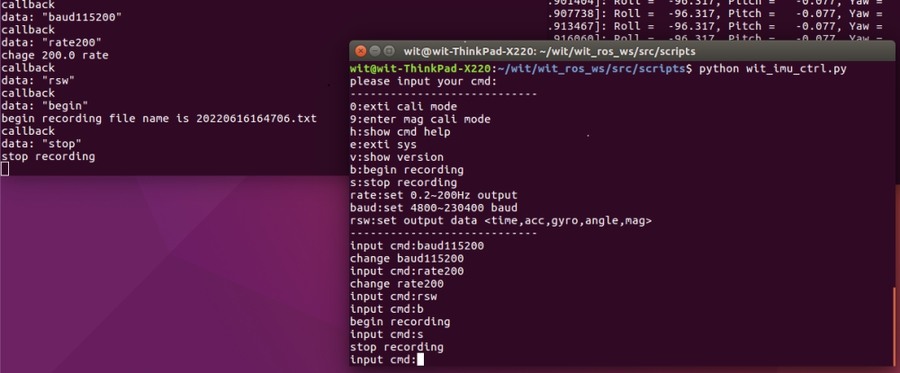
Take the return rate of 200Hz and the baud rate of 115200 as an example:
Record data
First set the return rate and baud rate to 200Hz and 115200 respectively
Enter under input cmd: rsw to set the recorded data returned by the sensor to include on-chip time, acceleration, angular velocity, angle, and magnetic field
Enter under input cmd: b to start recording raw data
Enter: s under input cmd to end the record
The recorded file is named after the current system year, month, day, hour, minute, and second, and the storage path is: ~/.ros/
And the first terminal will display the recorded file name, as shown above: 20220616164706.txt
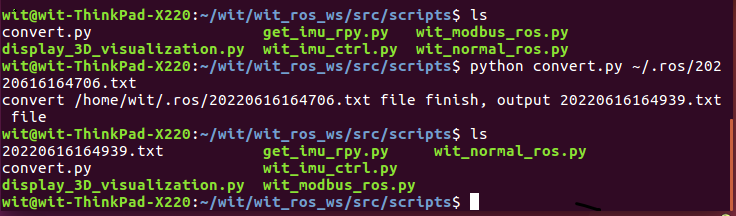
Parsing data
When the parsing data is successful, the file name after successful parsing will be displayed.
Terminal input command: ls
It can be seen that the parsed data text has been added under the current path
Open the text with a text editor
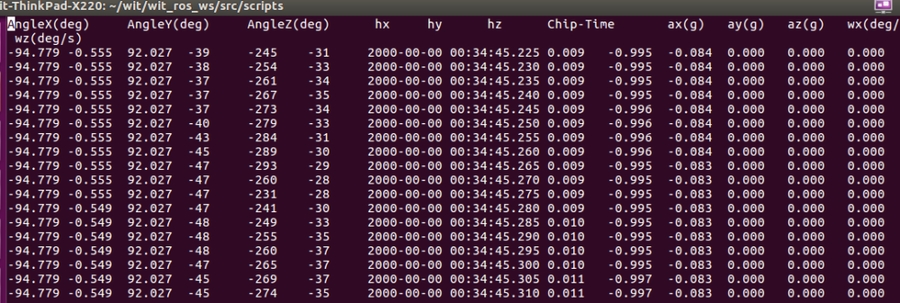
It can be seen that the data is returned every 5ms, indicating that the return rate reaches 200Hz/s
4. Serial port assistant test communication
Take ubuntu16.04 as an example, the baud rate is 9600
Install cutecom (you can also install other serial port assistants for debugging)。
2. To insert a serial port module, you need to check the port number of the newly added serial port module through the command ls /dev/ttyU*, and then grant read and write permissions to it, taking /dev/ttyUSB0 as an example, enter the command: sudo chmod 777 /dev/ ttyUSB0, and enter the administrator password when prompted. Note that every time a new USB module is inserted, the read and write permissions need to be re-assigned.
3. After the installation is successful, enter cutecom in the terminal, open the serial port assistant, and then make some settings. Note that the serial port number selected from the drop-down box is incorrect and needs to be modified according to the serial port number obtained in the second step above, such as /dev /ttyUSB0, as shown in the figure.
4. Then we click open device, and the imu data will be printed on the blank panel below.
5. We can wait for the imu data to be printed for a while, and then click close device to check.
6. If you can find the information starting with 55 51, 55 52, 55 53, then there is no problem with the data sent by the module. If there is data but the data with the correct header is not found, you need to check the baud rate setting and switch to the correct The baud rate can be displayed.
Last updated